
OBD-II Code P0137: O2 Sensor Circuit Low Voltage (Bank 1, Sensor 2)
The Ultimate Guide to Diagnosing and Fixing P0137 — Causes, Pro-Level Diagnostics, and Repair Costs
- Replacing the downstream O2 sensor fixes P0137 in 70% of cases, but always check for a blown heater fuse first to save $150.
- Inspect the exhaust system for soot marks or ticking sounds before buying parts, as a $20 leaking gasket triggers the exact same low-voltage code.
- Driving with an active P0137 code causes an automatic emissions test failure and drops fuel economy by 5-15%.
- Fix this code within 30 days to prevent the engine from running rich, which permanently damages the catalytic converter and turns a $150 repair into a $1,500 replacement.
What Does P0137 Mean?

Code P0137 signifies the Powertrain Control Module (PCM) detects a persistently low voltage signal from the downstream oxygen sensor (Bank 1, Sensor 2). This sensor sits immediately after the catalytic converter to monitor its efficiency by measuring exhaust oxygen content. A low voltage reading (under 0.2V) tells the PCM there is excess oxygen, pointing to a failed sensor, damaged wiring, or an exhaust leak.
Technical definition: The SAE/OBD-II definition for P0137 is "O2 Sensor Circuit Low Voltage (Bank 1, Sensor 2)". The PCM triggers this code when the Bank 1, Sensor 2 oxygen sensor's voltage remains below a calibrated threshold (typically 0.2V) for over 20 continuous seconds. This condition indicates a sensor circuit fault or abnormally high oxygen in the post-catalytic exhaust stream.
Can I Drive With P0137?
Yes, But With Caution. 🎬 Watch: Three simple DIY methods to fix code P0137 Yes, you can drive with a P0137 code, but fix it within 30 days. Continued driving causes a 5-15% reduction in fuel economy and triggers an automatic emissions test failure. The most significant risk is long-term damage to the catalytic converter due to an improper air-fuel mixture, a repair costing $800 to $2,500. It is safe for short trips, but avoid long-distance travel until resolved.
Common Causes

- Faulty Bank 1, Sensor 2 Oxygen (O2) Sensor (Very Common) — This is the most frequent culprit. The sensor's internal zirconia element degrades over time, or its heater circuit fails, preventing it from reaching the 600°F operating temperature required to generate a correct voltage.
- Exhaust System Leak (Common) — Cracks or holes in the exhaust manifold, flex pipe, or gaskets located before Sensor 2 pull outside air into the exhaust stream. This extra oxygen tricks the sensor into reporting a false lean condition, resulting in a low voltage signal.
- Damaged Wiring or Poor Connection (Common) — The sensor's wiring harness is exposed to extreme heat and road debris. Melted, chafed, or broken wires, along with corroded connector pins, create a short to ground or an open circuit.
- Blown Fuse for Sensor Heater Circuit (Less Common) — The O2 sensor's internal heater ensures quick warm-up and accurate readings. If the dedicated heater circuit fuse blows, the sensor remains cold and outputs an incorrect low voltage.
- Engine Running Lean (Less Common) — Systemic issues like a vacuum leak, low fuel pressure, or a faulty Mass Airflow (MAF) sensor cause the entire engine to run lean. This results in excess exhaust oxygen, triggering P0137 alongside primary codes like P0171 or P0174.
- Contamination from Fluid Leaks (Less Common) — Engine oil from a leaking valve cover or coolant from a blown head gasket contaminates the exhaust stream. This fluid fouls the O2 sensing element, causing premature failure and low voltage readings.
- Failing Catalytic Converter (Rare) — While a failing catalytic converter typically triggers a P0420 code, a physically damaged or internally collapsing converter alters exhaust flow, causing an erratic or low reading on the downstream sensor.
- Poor Engine Ground (Rare) — A corroded engine-to-chassis ground strap creates electrical noise and voltage drops. The O2 sensor circuit relies on a clean ground reference; a bad ground forces the PCM to read an artificially low voltage.
- Faulty Powertrain Control Module (PCM) (Very Rare) — In extremely rare instances, the PCM's internal driver for the O2 sensor circuit fails, or the software requires a manufacturer update to correctly interpret the sensor's signal. Rule out all other hardware first.
Symptoms
- Check Engine Light is On — The light illuminates and remains on as long as the PCM detects the low voltage fault.
- Failed Emissions Test — An active P0137 code triggers an automatic failure for any state emissions or smog inspection due to an active emissions system fault.
- Reduced Fuel Economy — The vehicle consumes more fuel than normal. The PCM defaults to a richer fuel mixture as a fail-safe measure when it loses reliable downstream oxygen data.
- Exhaust Odor — A significant exhaust leak before the sensor produces a raw exhaust smell. If the engine runs excessively rich as a fail-safe, you will smell a 'rotten egg' sulfur odor.
- Rough or Unstable Idle — The engine's idle speed fluctuates or feels rough when stopped, caused by the PCM making incorrect fuel trim adjustments based on faulty sensor data.
- Hesitation During Acceleration — Drivers experience sluggishness or hesitation, especially if the underlying cause (like a severe exhaust leak or lean condition) affects overall engine performance.
Diagnostic Flowchart
Tap your situation to follow the diagnostic path that matches what you're seeing on this code.
Common Fixes & Costs

- Replace the Bank 1, Sensor 2 Oxygen Sensor
— Parts: $50-$150, Labor: $75-$150, ~0.8 hr book time
(DIY)
Honda Civic (2001-2005): OEM Varies by specific model, check VIN. OEM Supplier is NTK. (Alt: NTK 24243, Denso 234-4092, Bosch 15408)
Ford F-150 (2004-2010): OEM Motorcraft DY-1401 (GU2Z-9G444-A) (Alt: Bosch 15717, Denso 234-4490, Walker 350-34414)
Chevrolet Silverado (1999-2007): OEM ACDelco 213-3867, 213-3533 (varies by engine/year) (Alt: Denso 234-4668, Bosch 13474) - Repair an Exhaust Leak — Parts: $20-$200, Labor: $100-$500, ~2.5 hr book time (Intermediate)
- Repair Damaged Wiring or Connector — Parts: $10-$40, Labor: $100-$250, ~1.5 hr book time (Intermediate)
- Replace a Blown Fuse — Parts: $1-$5, Labor: $0-$50, ~0.1 hr book time (DIY)
- Update or Reprogram PCM — Parts: $0, Labor: $100-$300, ~1 hr book time (Pro)
Used vs. New Parts: Buying Guide
When a used part is worth it: It is never a good idea to buy a used oxygen sensor. They are wear items with a finite lifespan, and a used one fails shortly after installation. The low cost of a new sensor does not justify the labor of installing a used one.
Donor-vehicle mileage cap: roughly under 10000 miles for the part to have meaningful remaining life.
Donor quality checklist:
- Avoid used O2 sensors entirely. The risk of premature failure is too high.
- If buying a new aftermarket sensor, choose a reputable OEM supplier like Denso, NTK/NGK, or Bosch to ensure compatibility.
- Verify the part number is an exact match for your vehicle's VIN.
Decision logic:
- If The part is an oxygen sensor → Always buy new from an OEM or reputable OEM-supplier brand. Do not use a generic, no-name part.
- If The vehicle is a European make (VW, Audi, BMW) → Strongly prefer the OEM brand (e.g., Bosch) as these cars are known to be sensitive to aftermarket sensors.
- If The part has known wear-out failure mode (e.g. O2 sensor heating element) → Favor new, as a used part is already partway through its service life.
Warranty tradeoff: Used parts: No warranty or 30-day max, not worth the risk. Aftermarket new: Typically 1-year to limited lifetime warranty. OEM new: Usually 1-year/12,000-mile warranty.
Worst-case if a used part fails: $150-300 if a used or cheap sensor fails after install, requiring repeat labor and the purchase of another, better part.
What Happens If You Wait — Timeline
- 0-2 weeks: Code P0137 is stored and the Check Engine Light is on. No other symptoms are likely to be noticeable by the driver. The vehicle automatically fails an OBD-II emissions test. (MPG impact: 0-3%% · Added cost: $0)
- 2 weeks - 3 months: A subtle drop in fuel economy becomes apparent. In some cases, a slightly unstable or rough idle is felt, especially on cold starts. The PCM defaults to a richer fuel map as a protective measure. (MPG impact: 3-8%% · Added cost: $25-$75 in wasted fuel)
- 3-8 months: The sustained incorrect air-fuel mixture begins to affect the catalytic converter's health. The converter starts to overheat, causing the internal ceramic substrate to become stressed or begin to form micro-cracks. (MPG impact: 5-15%% · Added cost: Risk of catalytic converter damage begins. Potential cost if failure occurs: $800-$1500.)
- 8+ months: Permanent damage to the catalytic converter is highly likely. The substrate melts, clogs, or breaks apart from prolonged overheating. A P0420 (Catalyst Efficiency) code appears. Engine performance is noticeably worse. (MPG impact: 10-20%% · Added cost: $1000-$2800 for catalytic converter replacement is now probable.)
Cost of Not Fixing It
- 0-1 month: Reduced fuel economy by 5-15% and guaranteed failure of any emissions test. (Added cost: $20-$60 in wasted fuel per month.)
- 1-6 months: The PCM operates in a default rich-fuel condition to protect the engine, which begins to overheat and stress the catalytic converter. (Added cost: Negligible, but risk of major damage increases significantly.)
- 6+ months: Prolonged exposure to an incorrect air-fuel ratio permanently damages the catalytic converter, requiring its replacement. (Added cost: $1000-$2800 for catalytic converter replacement.)
Diagnosis Steps
- Scan for Additional Codes
Using an OBD-II scanner, confirm P0137 and check for related codes. Codes like P0171 (Lean) or P2096 (Post Catalyst Lean) indicate P0137 is a symptom of a larger air-fuel issue, not the root cause.
Tools: OBD-II Scanner (Beginner) - Visually Inspect Exhaust System
With the vehicle safely raised, inspect the exhaust system from the engine manifold to the catalytic converter. Look for black soot stains around gaskets indicating a leak, and listen for ticking sounds on a cold start.
Tools: Jack and Jack Stands, Flashlight, Safety Glasses (Beginner) - Inspect O2 Sensor Wiring and Connector
Trace the wiring from the Bank 1, Sensor 2 O2 sensor back to the main harness. Look for melted plastic, chafing against heat shields, and brittle insulation. Unplug the connector to check for green corrosion or oil contamination.
Tools: Flashlight (Intermediate) - Analyze Live Sensor Data
Use a scanner with live data capabilities. A healthy, warm downstream O2 sensor displays a stable voltage between 0.5V and 0.8V. A reading stuck flat below 0.2V confirms the low voltage fault.
Tools: OBD-II Scanner with Live Data (Intermediate) - [PRO TIP] Test the Sensor Heater Circuit
Unplug the sensor. Using a multimeter set to Ohms (Ω), measure the resistance between the two heater pins on the sensor side. A healthy heater circuit reads between 2 and 30 Ohms. An infinite reading (OL) confirms a dead sensor.
Tools: Digital Multimeter, Wiring Diagram (Advanced) - [PRO TIP] Check for Bias Voltage
With the sensor unplugged and the key 'On' (engine off), check the voltage on the signal wire pin on the harness side. The PCM supplies a 450mV (0.45V) bias voltage. Seeing 0V or 12V indicates a wiring short.
Tools: Digital Multimeter, Wiring Diagram (Advanced) - [PRO TIP] Perform an Exhaust Smoke Test
A smoke machine forces pressurized, visible smoke into the exhaust system to reveal microscopic leaks. Smoke pouring out of cracks or gasket failures pinpoints the exact source of false oxygen entering the system.
Tools: Smoke Machine (Expert) - [PRO TIP] Check Fuel Pressure
If P0171 is present, connect a fuel pressure gauge to the fuel rail. Key on, engine off (KOEO) pressure should be 35-55 PSI. Pressure below 30 PSI indicates a weak fuel pump causing the lean condition.
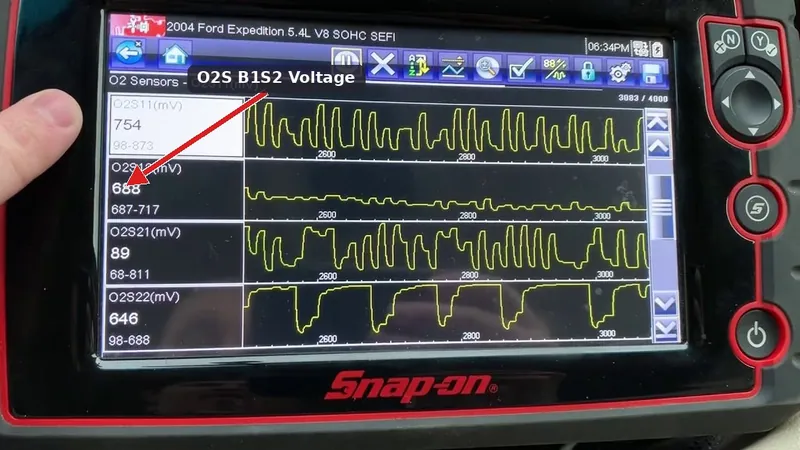
Tools: Fuel Pressure Gauge, Vehicle-Specific Specs (Advanced) - [PRO TIP] Analyze the Waveform
Using a graphing scanner, observe the Sensor 2 waveform. A healthy sensor shows a lazy, stable line around 0.7V. A rapidly switching waveform mimicking Sensor 1 indicates a dead catalytic converter.
Tools: Graphing Scanner or Oscilloscope (Expert)
When This Code Triggers (Freeze-Frame Conditions)
- Engine Coolant Temp: 180-210°F (82-99°C) (Engine at full operating temperature.)
- RPM: 1200-3000 RPM (Steady cruise or light acceleration, not typically at idle.)
- Engine Load: 20-60% (Vehicle is under moderate load, maintaining speed on a flat road or slight incline.)
- Vehicle Speed: 40-65 mph (64-105 kph) (Sustained highway or freeway driving conditions.)
Related Codes
- P0136 — P0136 indicates a general 'Circuit Malfunction' for the same sensor (Bank 1, Sensor 2), while P0137 is more specific, indicating the voltage is consistently low. They point to the same root causes, but P0137 provides more diagnostic detail.
- P2096 — This code means 'Post Catalyst Fuel Trim System Too Lean Bank 1'. It frequently appears with P0137. This combination almost always points to an exhaust leak between Sensor 1 and Sensor 2.
- P0171 — This code means 'System Too Lean (Bank 1)'. If you see P0171 with P0137, it confirms the problem is not isolated to the Sensor 2 circuit. The root cause is an issue affecting the entire engine bank, such as a major vacuum leak or low fuel pressure.
- P0138 — This is the opposite of P0137, indicating 'O2 Sensor Circuit High Voltage'. Seeing P0137 and P0138 for the same sensor simultaneously is extremely rare but is a definitive sign of a wiring problem, suggesting the signal wire is shorting to both ground and power.
Climate & Environmental Factors
- Cold Climates / Road Salt: Road salt dramatically accelerates the corrosion of exhaust pipes and welds. This corrosion creates exhaust leaks that pull outside air into the system, triggering a false low voltage reading.
- Short-Trip Driving: Frequent short trips prevent the exhaust system from reaching temperatures high enough to burn off condensation. Trapped moisture rots the exhaust system from the inside out.
- High Humidity: Moisture penetrates weathered wiring or unsealed connectors, causing rapid pin corrosion and electrical shorts in the O2 sensor circuit.
- High Altitude: Operating at high altitude results in a lower oxygen environment, altering the air-fuel management system and exposing borderline sensor degradation that remains hidden at sea level.
How to Talk to a Mechanic About This Code
Say this: "I have a P0137 code and I'd like to schedule a diagnostic. Before replacing any parts, please check for exhaust leaks, inspect the sensor wiring, and check the live voltage reading for the Bank 1 Sensor 2 O2 sensor."
This signals you've done research and prevents a shop from immediately replacing the sensor without diagnosing common underlying causes like a cheap-to-fix exhaust leak or wiring fault.
Avoid saying:
- 'My check engine light is on, can you look at it?'
- 'Just fix whatever is wrong.'
- 'My car is running a little weird.'
Questions to ask before authorizing the repair:
- What was the live voltage reading from the sensor? Was it stuck low?
- Did you find any exhaust leaks or wiring damage during your inspection?
- If you are recommending a new sensor, are you using an OEM or OEM-equivalent brand?
- What is the warranty on the parts and labor for this repair?
Where to Take It: Dealer vs Independent vs Chain
- Dealer:
Recommended only for warranty work or if a specific TSB applies.
Best for: Vehicles still under the emissions warranty (8yr/80k miles for major components, or 15yr/150k for PZEV models)., Vehicles with known TSBs for P0137 (like specific Subaru models).
Downsides: Highest labor rates, often 1.5-2x more than independent shops., May recommend more expensive, wholesale repairs instead of targeted fixes. (Typical cost: +50% vs. baseline) - Independent Shop:
Best fit. A reputable independent shop offers the best balance of diagnostic expertise and fair pricing for this code.
Best for: Most out-of-warranty vehicles., Accurate diagnosis of common but sometimes tricky codes like P0137.
Downsides: Quality varies greatly. Vet shops based on online reviews and ASE certifications. (Typical cost: +0% vs. baseline) - Chain Shop:
Acceptable if you have already diagnosed a bad sensor yourself and just need it replaced. AVOID for initial diagnosis, as they may miss an exhaust leak or wiring issue.
Best for: Simple, straightforward part replacements.
Downsides: Technician skill can be inconsistent., May lack the advanced diagnostic tools (like smoke machines) to properly trace exhaust leaks, leading to misdiagnosis. (Typical cost: -10% vs. baseline)
When to Walk Away From the Repair
If the total estimated repair cost exceeds 40-50% of your car's private-party value (use Kelley Blue Book or similar), it's time to seriously consider selling or trading it in.
- Car worth $4000, fix is $350: Fix it. This is a low-cost repair well below the threshold.
- Car worth $4000, fix is $1800: Borderline. This suggests a worst-case scenario (catalytic converter). Get a second opinion before authorizing.
- Car worth $2500, fix is $1800: Walk away. The repair cost is over 70% of the car's value.
What Scan Tool You Need for This Code
Minimum: A scanner that can read and graph live O2 sensor voltage data.
A basic $20 code reader only gives you the P0137 code, leading you to guess at the fix. Seeing the live voltage data is the first and most critical diagnostic step to confirm if the sensor is truly stuck low or if the problem is intermittent.
Budget: BlueDriver Pro Scan Tool (~$100) — Connects to your smartphone via Bluetooth and provides live data graphing for the O2 sensor, reads freeze-frame data, and accesses Mode 06 test results, which is excellent for emissions diagnostics.
Mid-range: Innova 5610 (~$330) — A powerful handheld unit that offers live data graphing, ABS/SRS checks, and some bidirectional controls to test components. It provides a more robust, all-in-one solution than app-based scanners.
Professional: Autel MaxiCOM MK808S (~$500) — Offers comprehensive, professional-level diagnostics. It provides fast, detailed live data, advanced bidirectional controls, and access to manufacturer-specific codes and procedures, essential for diagnosing complex wiring or module issues.
Rent vs buy: If this is a one-time fix, AutoZone's Loan-A-Tool program allows you to borrow a scanner for free by leaving a refundable deposit. Buy a scanner only if you plan to do your own diagnostics more than once a year.
How to Clear the Code After You Fix It
- Use an OBD-II scan tool to clear the P0137 code.
- Disconnecting the battery for 15 minutes also clears codes but resets all readiness monitors.
- Perform a complete drive cycle to allow readiness monitors to run.
Drive cycle (~20 minutes): From a cold start (sit overnight), idle for 2-3 minutes. Drive a mix of city (stop-and-go) and highway speeds. Include a period of steady-state cruising at 55 mph for at least 5 minutes. Allow the vehicle to coast down without braking where possible.
Readiness monitors affected: Catalyst monitor, O2 sensor monitor, O2 sensor heater monitor
Before emissions retest: drive at least 50 miles to fully set monitors.
Watch out for:
- Clearing the code and immediately going for an emissions test results in a 'Not Ready' failure.
- The code returns within a few drive cycles if the root cause (like an exhaust leak) was not properly fixed.
- Some vehicles require very specific drive cycle conditions that are difficult to meet in normal traffic.
Will This Fail Emissions / State Inspection?
Yes — this code typically fails an OBD-II emissions inspection.
- California: An active P0137 code is an automatic failure. All OBD readiness monitors must be set to 'Ready'. After repair, you must drive 50-100 miles over several trips to complete the drive cycle before re-testing.
- New York: NYS DMV inspection connects directly to the OBD-II port; an illuminated Check Engine Light for P0137 is an automatic failure. After clearing the code, the vehicle must be driven to reset the readiness monitors.
- Texas: In the 17 counties requiring emissions testing, an active P0137 code causes an automatic failure of the OBD portion of the inspection.
Most Commonly Affected Vehicles
- Honda Civic, Accord (2001-2011) — Often caused by a failing sensor or a blown 'A/F Sensor' fuse in the under-hood fuse box. Replacement is straightforward.
- Ford F-150, Escape, Explorer (2004-2014) — Prone to exhaust manifold leaks and wiring harness chafing. Inspect the harness for contact with the frame or suspension components. A professional O2 sensor replacement costs around $200-$350.
- Chevrolet / GMC Silverado, Sierra, Tahoe (1999-2007) — Exhaust manifold bolts are known to break, causing a significant exhaust leak and a ticking noise. This is a very common cause of P0137 on these trucks. The code may be listed as 'HO2S' (Heated Oxygen Sensor).
- Toyota Camry, Corolla, Yaris (2002-2012) — Typically a reliable diagnosis of a failed O2 sensor. Denso is the OEM supplier and is the recommended replacement brand.
- Hyundai / Kia Sonata, Elantra, Santa Fe, Tucson, Optima, Sorento (2010-2020) — A high-frequency code for these models. While often a bad sensor, there are some TSBs related to wiring harness issues. Check for corrosion in the main harness connectors.
- Nissan Altima, Sentra, Rogue, Frontier (2005-2018) — Frequently caused by a failed downstream O2 sensor. NTK is the OEM supplier. Exhaust leaks at the catalytic converter flanges are also a common culprit.
- Subaru Forester, WRX, Outback (2014-2021) — Subaru issued Technical Service Bulletin (TSB) #11-174-17R for this exact code, especially on Foresters. The fix involves replacing the original rear O2 sensor with an updated, more durable part (Part #22791AA06A).
- Jeep Wrangler (JK) (2012-2018) — This code frequently appears with P2096. The cause is often a small crack in the exhaust Y-pipe or a failing catalytic converter, in addition to sensor failure. An O2 sensor spacer is sometimes used as a temporary, off-road-only workaround for modified exhausts but does not fix the root cause.
- Volkswagen / Audi Jetta, Golf, Passat, A4 (2008-2017) — Commonly a failed downstream oxygen sensor. Bosch is the OEM supplier. Leaks from the turbocharger-to-downpipe gasket can also trigger this code on turbocharged models.
Manufacturer-Specific Notes
- General Motors (Chevy, GMC): GM often uses the term 'HO2S' (Heated Oxygen Sensor). On V6 and V8 engines, listen for a distinct 'ticking' sound from the engine bay on a cold start, which is a classic symptom of broken exhaust manifold bolts causing a leak.
- Honda: On many 2000s models, a blown fuse (#4 or #15, depending on the model) in the under-hood fuse box labeled 'A/F SENSOR' or 'LAF' is a common cause of P0137. Always check this fuse before replacing the sensor.
- Subaru: Subaru has a well-known Technical Service Bulletin (TSB 11-174-17R) for this code on models like the Forester and WRX (2014-2018). The official fix is to replace the rear O2 sensor with an updated, more robust part.
- Federal & PZEV Warranty: Under the Federal Emissions Warranty, most emissions parts like O2 sensors are covered for 2 years/24,000 miles. If your vehicle is certified as a PZEV (Partial Zero-Emission Vehicle), the warranty for emissions components is often extended to 15 years/150,000 miles.
Real Owner Stories
2015 Subaru WRX with P0137 & P2270
Check Engine Light came on. Symptoms included a weird idle on startup (sometimes stalling) and a 'rotten egg' (sulfur) exhaust smell.
What they tried:
- Scanned codes and found P0137 and P2270, both pointing to the rear O2 sensor (Bank 1, Sensor 2).
Outcome: Replaced the rear O2 sensor with an OEM-equivalent Denso part (Part #: 234-4988). The Check Engine Light was cleared and did not return after a week and a half of driving. The car ran well and the issue was resolved.
Lesson: A straightforward sensor replacement is the correct fix when symptoms like a sulfur smell and rough idle are present. Using an OEM or OEM-equivalent part (like Denso for Subaru) is a reliable choice.
2022 Mitsubishi Outlander Sport with persistent P0137
After initially getting a P0420 (Catalyst Efficiency) code, the owner replaced the downstream O2 sensor with a non-OEM part where the wires were cut and spliced. The P0137 code then appeared and would not go away.
What they tried:
- Replaced downstream O2 sensor with a non-OEM part.
- Installed a straight O2 sensor spacer, which temporarily resolved a P2096 code but not P0137.
- Switched to a 90-degree spacer, but the P0137 code remained.
Outcome: The owner was left with a persistent P0137 code. The mechanic blamed the catalytic converter, but the owner suspected the non-OEM sensor and spliced wiring were the true cause.
Lesson: Avoid non-OEM sensors with spliced wires. The PCM is sensitive to correct voltage and resistance; a poor-quality part or bad connection is a common cause of a returned code. Spacers are not a fix for circuit codes like P0137.
2020 Subaru WRX STI with aftermarket parts
After installing a high-flow catalytic converter, the owner got a P0420 code. To fix this, they installed an O2 sensor spacer. The P0420 code went away, but a new P0137 code appeared and put the car into 'limp mode'.
What they tried:
- Installed an O2 sensor spacer to fix a P0420 code.
- Replaced the rear O2 sensor with a new one, but the P0137 code immediately returned.
Outcome: The code persisted daily. The issue was likely related to the Cobb 'Green Speed' tune, which is less tolerant of aftermarket downpipes, or the spacer pulling the sensor too far out of the exhaust stream, causing a false low voltage reading.
Lesson: On tuned vehicles, especially with aftermarket exhaust parts, codes like P0137 are a side effect of the modifications themselves. An O2 spacer causes P0137 by creating an artificially lean reading, and a standard sensor replacement won't fix it.
How to Prevent This Code From Triggering
- Use Top Tier certified gasoline (Every fill-up) — Higher levels of detergents in Top Tier fuels prevent carbon buildup on fuel injectors and valves. This ensures more complete combustion, reducing unburnt fuel and contaminants that foul O2 sensors and overload the catalytic converter.
- Address engine misfires and fluid leaks immediately (As they occur) — Misfires send raw fuel into the exhaust, which overheats and melts the catalytic converter. Oil or coolant leaks contaminate the O2 sensor's sensing element, causing it to fail prematurely.
- Perform regular long-distance drives (At least once every 1-2 weeks) — Frequent short trips prevent the exhaust system from getting hot enough to burn off condensation and carbon deposits. A sustained highway drive (20+ minutes) allows the catalytic converter to reach optimal temperature (over 1100°F), cleaning itself and preventing internal buildup.
- Replace upstream (Sensor 1) O2 sensors proactively (Every 100,000 miles) — Upstream O2 sensors degrade with age and become slow to respond. A slow sensor causes the PCM to maintain a slightly incorrect air-fuel ratio, stressing the catalytic converter over time. Replacing them is preventative maintenance for the entire emissions system.
- Adhere to scheduled engine maintenance (Per manufacturer's schedule (e.g., 30k/60k/90k miles)) — Regularly replacing spark plugs, engine air filters, and cleaning the MAF sensor ensures the engine runs efficiently. This prevents lean or rich conditions that trigger emissions codes and damage components over the long term.
Frequently Asked Questions
What is 'Bank 1' and 'Sensor 2'?
'Bank 1' is the side of the engine that contains cylinder #1. For inline engines (4-cylinder, straight-6), there is only one bank. 'Sensor 2' is always the 'downstream' oxygen sensor, located in the exhaust stream after the catalytic converter.
How much does it cost to fix code P0137?
A DIY O2 sensor replacement costs $50-$150 for the part. A professional replacement is typically $150-$350. Repairing an exhaust leak ranges from $100 for a simple gasket to over $600 for a manifold replacement.
What is the most common mistake when fixing P0137?
The most common mistake is replacing the O2 sensor without performing any diagnosis. An exhaust leak or wiring issue triggers the exact same code, and replacing the sensor will not fix it. Always inspect the exhaust and wiring first.
Should I use a cheaper aftermarket O2 sensor or an OEM one?
For this specific sensor, using an OEM or high-quality OEM-supplier (like Denso or NTK/NGK) part is strongly recommended. Vehicle PCMs are very sensitive to the voltage and resistance of the downstream sensor. A cheap aftermarket sensor often causes the P0137 code to return.
Is an O2 sensor covered under warranty?
Under the standard Federal Emissions Warranty, O2 sensors are covered for 2 years or 24,000 miles. However, PZEV (Partial Zero-Emission Vehicle) certified cars in California-compliant states extend this warranty to 15 years or 150,000 miles. Check your specific warranty booklet before paying out of pocket.
Can a vacuum leak cause a P0137 code?
Yes, a significant vacuum leak introduces unmetered air, causing the engine to run lean and increasing exhaust oxygen levels. However, a vacuum leak almost always sets a P0171 (System Too Lean) code alongside P0137. If P0137 is the only code, a vacuum leak is highly unlikely.
Can I clean an oxygen sensor to fix P0137?
No, cleaning an O2 sensor is not a reliable or recommended repair. The P0137 code is caused by an electrical fault (low voltage signal), which cleaning cannot fix. The failure is internal to the sensor's element or heater, requiring replacement.
Will an O2 sensor spacer or 'CEL eliminator' fix P0137?
No. An O2 sensor spacer pulls the sensor out of the direct exhaust stream to trick the PCM, but it does not fix a low voltage circuit fault and often worsens the reading.
How long does it take to replace a downstream O2 sensor?
For a DIYer with an O2 sensor socket, the job typically takes 30-60 minutes. For a professional mechanic, it is usually a 0.5-hour job. However, if the sensor is rusted and seized in the exhaust pipe, it takes much longer and requires heat to remove.
Key Takeaways
- Replacing the downstream O2 sensor fixes P0137 in 70% of cases, but always check for a blown heater fuse first to save $150.
- Inspect the exhaust system for soot marks or ticking sounds before buying parts, as a $20 leaking gasket triggers the exact same low-voltage code.
- Driving with an active P0137 code causes an automatic emissions test failure and drops fuel economy by 5-15%.
- Fix this code within 30 days to prevent the engine from running rich, which permanently damages the catalytic converter and turns a $150 repair into a $1,500 replacement.
Helpful Videos
![How to Fix P0137 Engine Code in 4 Minutes [3 DIY Methods / Only $9.42]](https://img.youtube.com/vi/D7iaXnsbzWQ/mqdefault.jpg)
Shop the Parts Behind P0137
Below are the parts most often responsible for code P0137, ranked by how frequently each one is the actual culprit (per the diagnosis above). Tap any to see what we have for your vehicle.


The information in this article is provided for general reference and educational purposes only. Vehicle specifications, procedures, and part compatibility can vary by production date, trim level, and region. Always consult your vehicle's factory service manual and verify part numbers before purchasing or performing repairs. Safety-critical components such as airbags, seat belts, and braking systems should be installed by a qualified professional.
- 🧭 Diagnostic Flowchart
- 🎬 Helpful Videos
- 🛍️ Shop This Part
- What Does P0137 Mean?
- Can I Drive With P0137?
- Common Causes
- Symptoms
- Common Fixes & Costs
- Used vs. New Parts: Buying Guide
- What Happens If You Wait — Timeline
- Cost of Not Fixing It
- Diagnosis Steps
- When This Code Triggers (Freeze-Frame Conditions)
- Related Codes
- Climate & Environmental Factors
- How to Talk to a Mechanic About This Code
- Where to Take It: Dealer vs Independent vs Chain
- When to Walk Away From the Repair
- What Scan Tool You Need for This Code
- How to Clear the Code After You Fix It
- Will This Fail Emissions / State Inspection?
- Most Commonly Affected Vehicles
- Manufacturer-Specific Notes
- Real Owner Stories
- 2015 Subaru WRX with P0137 & P2270
- 2022 Mitsubishi Outlander Sport with persistent P0137
- 2020 Subaru WRX STI with aftermarket parts
- How to Prevent This Code From Triggering
- Frequently Asked Questions
- What is 'Bank 1' and 'Sensor 2'?
- How much does it cost to fix code P0137?
- What is the most common mistake when fixing P0137?
- Should I use a cheaper aftermarket O2 sensor or an OEM one?
- Is an O2 sensor covered under warranty?
- Can a vacuum leak cause a P0137 code?
- Can I clean an oxygen sensor to fix P0137?
- Will an O2 sensor spacer or 'CEL eliminator' fix P0137?
- How long does it take to replace a downstream O2 sensor?
- Key Takeaways